Tags: Cross-Platform, Android NDK, CMake, OpenGL ES 3.2, C++ Core, Mobile & Desktop, Software Architecture
Now we will try to run TheApp spinning triangle sample on Android. For this we’ll need:
- provide /p_android/platform.cpp/h implementation
- and replace flashing green screen code in main.cpp by theApp.run() call
Didn’t find how to add classes/files outside of cpp folder in Android Studio, so let’s do it manually.
1. In Windows File Explorer create a new folder
C:/CPP/p_android
2. In a text editor (I use Notepad++) create a file
C:/CPP/p_android/platform.h
Code:
#pragma once
#include <GLES3/gl32.h>
void mylog(const char* _Format, ...);
void mySwapBuffers();
void myPollEvents();
3. In a text editor create a file
C:/CPP/p_android/platform.cpp
#include <android/log.h>
#include "stdio.h"
#include "TheApp.h"
#include <EGL/egl.h>
#include <game-activity/native_app_glue/android_native_app_glue.h>
extern struct android_app* pAndroidApp;
extern EGLDisplay androidDisplay;
extern EGLSurface androidSurface;
extern TheApp theApp;

void mylog(const char* _Format, ...) {
    char outStr[1024];
    va_list _ArgList;
    va_start(_ArgList, _Format);
    vsprintf(outStr, _Format, _ArgList);
    __android_log_print(ANDROID_LOG_INFO, "mylog", outStr, NULL);
    va_end(_ArgList);
};

void mySwapBuffers() {
    eglSwapBuffers(androidDisplay, androidSurface);
}
void myPollEvents() {
    // Process all pending events before running game logic.
    int events;
    android_poll_source *pSource;
    if (ALooper_pollAll(0, nullptr, &events, (void **) &pSource) >= 0)
        if (pSource)
            pSource->process(pAndroidApp, pSource);
    //if no display - wait for it
    while (androidDisplay == EGL_NO_DISPLAY)
        if (ALooper_pollAll(0, nullptr, &events, (void **) &pSource) >= 0)
            if (pSource)
                pSource->process(pAndroidApp, pSource);
    // handle all queued inputs
    for (auto i = 0; i < pAndroidApp->motionEventsCount; i++) {
        // cache the current event
        auto &motionEvent = pAndroidApp->motionEvents[i];
        // cache the current action
        auto action = motionEvent.action;
        // Find the pointer index, mask and bitshift to turn it into a readable value
        auto pointerIndex = (action & AMOTION_EVENT_ACTION_POINTER_INDEX_MASK)
                >> AMOTION_EVENT_ACTION_POINTER_INDEX_SHIFT;
        //aout << "Pointer " << pointerIndex << ":";
        // get the x and y position of this event
        auto &pointer = motionEvent.pointers[pointerIndex];
        auto x = GameActivityPointerAxes_getX(&pointer);
        auto y = GameActivityPointerAxes_getY(&pointer);
        //aout << "(" << x << ", " << y << ") ";
        // Only consider touchscreen events, like touches
        auto actionMasked = action & AINPUT_SOURCE_TOUCHSCREEN;
        // determine the kind of event it is
        switch (actionMasked) {
            case AMOTION_EVENT_ACTION_DOWN:
            case AMOTION_EVENT_ACTION_POINTER_DOWN:
                //aout << "Pointer Down";
                break;
            case AMOTION_EVENT_ACTION_UP:
            case AMOTION_EVENT_ACTION_POINTER_UP:
                //aout << "Pointer Up";
                break;
            default:
                ;//aout << "Pointer Move";
        }
    }
    android_app_clear_motion_events(pAndroidApp);
    // handle key inputs
    for (auto i = 0; i < pAndroidApp->keyUpEventsCount; i++) {
        // cache the current event
        auto &keyEvent = pAndroidApp->keyUpEvents[i];
        if (keyEvent.keyCode == AKEYCODE_BACK) {
            // actions on back key
            theApp.bExitApp = true;
        }
    }
    android_app_clear_key_up_events(pAndroidApp);
}
- Please note: mylog implementation prints in Android Studio’s logcat window.
4. Start Android Studio,
open C:\CPP\a999hello\pa project.
5. Replace flashing green screen code by theGame.run() call.
Open main.cpp and replace code by:
#include "platform.h"
#include <jni.h>
#include <EGL/egl.h>
#include <game-activity/GameActivity.cpp>
#include <game-text-input/gametextinput.cpp>
#include <game-activity/native_app_glue/android_native_app_glue.c>
#include "TheApp.cpp"
TheApp theApp;
struct android_app* pAndroidApp = NULL;
EGLDisplay androidDisplay = EGL_NO_DISPLAY;
EGLSurface androidSurface = EGL_NO_SURFACE;
EGLContext androidContext = EGL_NO_CONTEXT;
bool bExitApp = false;
int screenSize[2] = {0,0};
void android_init_display() {
    // Choose your render attributes
    constexpr EGLint attribs[] = {
            EGL_RENDERABLE_TYPE, EGL_OPENGL_ES3_BIT,
            EGL_SURFACE_TYPE, EGL_WINDOW_BIT,
            EGL_BLUE_SIZE, 8,
            EGL_GREEN_SIZE, 8,
            EGL_RED_SIZE, 8,
            EGL_DEPTH_SIZE, 24,
            EGL_NONE
    };
    // The default display is probably what you want on Android
    auto display = eglGetDisplay(EGL_DEFAULT_DISPLAY);
    eglInitialize(display, nullptr, nullptr);
    // figure out how many configs there are
    EGLint numConfigs;
    eglChooseConfig(display, attribs, nullptr, 0, &numConfigs);
    // get the list of configurations
    std::unique_ptr<EGLConfig[]> supportedConfigs(new EGLConfig[numConfigs]);
    eglChooseConfig(display, attribs, supportedConfigs.get(), numConfigs, &numConfigs);
    // Find a config we like.
    // Could likely just grab the first if we don't care about anything else in the config.
    // Otherwise hook in your own heuristic
    auto config = *std::find_if(
            supportedConfigs.get(),
            supportedConfigs.get() + numConfigs,
            [&display](const EGLConfig &config) {
                EGLint red, green, blue, depth;
                if (eglGetConfigAttrib(display, config, EGL_RED_SIZE, &red)
                    && eglGetConfigAttrib(display, config, EGL_GREEN_SIZE, &green)
                    && eglGetConfigAttrib(display, config, EGL_BLUE_SIZE, &blue)
                    && eglGetConfigAttrib(display, config, EGL_DEPTH_SIZE, &depth)) {
                    //aout << "Found config with " << red << ", " << green << ", " << blue << ", "
                    //     << depth << std::endl;
                    return red == 8 && green == 8 && blue == 8 && depth == 24;
                }
                return false;
            });
    // create the proper window surface
    EGLint format;
    eglGetConfigAttrib(display, config, EGL_NATIVE_VISUAL_ID, &format);
    EGLSurface surface = eglCreateWindowSurface(display, config, pAndroidApp->window, nullptr);
    // Create a GLES 3 context
    EGLint contextAttribs[] = {
            EGL_CONTEXT_MAJOR_VERSION, 3,
            EGL_CONTEXT_MINOR_VERSION, 2,
            EGL_NONE};
    EGLContext context = eglCreateContext(display, config, nullptr, contextAttribs);
    // get some window metrics
    auto madeCurrent = eglMakeCurrent(display, surface, surface, context);
    if(!madeCurrent) {
        ;
    }
    androidDisplay = display;
    androidSurface = surface;
    androidContext = context;
}
void android_term_display() {
    if (androidDisplay != EGL_NO_DISPLAY) {
        eglMakeCurrent(androidDisplay, EGL_NO_SURFACE, EGL_NO_SURFACE, EGL_NO_CONTEXT);
        if (androidContext != EGL_NO_CONTEXT) {
            eglDestroyContext(androidDisplay, androidContext);
            androidContext = EGL_NO_CONTEXT;
        }
        if (androidSurface != EGL_NO_SURFACE) {
            eglDestroySurface(androidDisplay, androidSurface);
            androidSurface = EGL_NO_SURFACE;
        }
        eglTerminate(androidDisplay);
        androidDisplay = EGL_NO_DISPLAY;
    }
}
void handle_cmd(android_app *pApp, int32_t cmd) {
    switch (cmd) {
        case APP_CMD_INIT_WINDOW:
            android_init_display();
            //updateRenderArea
            EGLint width,height;
            eglQuerySurface(androidDisplay, androidSurface, EGL_WIDTH, &width);
            eglQuerySurface(androidDisplay, androidSurface, EGL_HEIGHT, &height);
            screenSize[0] = 0;
            screenSize[1] = 0;
            theApp.onScreenResize(width,height);
            break;
        case APP_CMD_TERM_WINDOW:
            android_term_display();
            break;
        default:
            break;
    }
}
/*!
 * This the main entry point for a native activity
 */
void android_main(struct android_app *pApp) {
    pAndroidApp = pApp;
    // register an event handler for Android events
    pApp->onAppCmd = handle_cmd;
    myPollEvents(); //this will wait for display initialization
    theApp.run();
    android_term_display();
    std::terminate();
}
It remains only to add new classes/files to the project. Unlike Visual Studio, here we will do this not in the project properties, but in CMakeLists.txt.
6. Open CMakeLists.txt
and replace code by:
# For more information about using CMake with Android Studio, read the
# documentation: https://d.android.com/studio/projects/add-native-code.html
# Sets the minimum version of CMake required to build the native library.
cmake_minimum_required(VERSION 3.22.1)
# Declares and names the project.
project("pa")
# Creates and names a library, sets it as either STATIC
# or SHARED, and provides the relative paths to its source code.
# You can define multiple libraries, and CMake builds them for you.
# Gradle automatically packages shared libraries with your APK.
set(rootDir "../../../../../")
set(platform "${rootDir}/../p_android")
set(engine "${rootDir}/../engine")
add_library( # Sets the name of the library.
        pa
        # Sets the library as a shared library.
        SHARED
        # Provides a relative path to your source file(s).
        ${platform}/platform.cpp
        main.cpp
        )
target_include_directories(pa
        PUBLIC
        ${rootDir}
        ${platform}
        ${engine}
        )
# Searches for a specified prebuilt library and stores the path as a
# variable. Because CMake includes system libraries in the search path by
# default, you only need to specify the name of the public NDK library
# you want to add. CMake verifies that the library exists before
# completing its build.
find_library( # Sets the name of the path variable.
        log-lib
        # Specifies the name of the NDK library that
        # you want CMake to locate.
        log)
# Searches for a package provided by the game activity dependency
find_package(game-activity REQUIRED CONFIG)
# Specifies libraries CMake should link to your target library. You
# can link multiple libraries, such as libraries you define in this
# build script, prebuilt third-party libraries, or system libraries.
target_link_libraries( # Specifies the target library.
        pa
        android
        # The game activity
        game-activity::game-activity
        # EGL, required for configuring the display context
        EGL
        # GL ES 3, used for the sample renderer
        GLESv3
        # for AImageDecoder, to load images from resources
        jnigraphics
        # Links the target library to the log library
        # included in the NDK.
        ${log-lib})
- Please note, line 11: CMakeLists.txt file is physically located in C:\CPP\a999hello\pa\app\src\main\cpp folder, FIVE folder levels down from project’s root in C:\CPP\a999hello.
Just in case, I also added ES 3.2 requirement into the Manifest.
7. Open AndroidManifest.xml
and replace code by:
<?xml version="1.0" encoding="utf-8"?>
<manifest xmlns:android="http://schemas.android.com/apk/res/android"
    xmlns:tools="http://schemas.android.com/tools">
    <uses-feature android:glEsVersion="0x00030002" android:required="true" />
    <application
        android:allowBackup="true"
        android:dataExtractionRules="@xml/data_extraction_rules"
        android:fullBackupContent="@xml/backup_rules"
        android:icon="@mipmap/ic_launcher"
        android:label="Hello Android"
        android:supportsRtl="true"
        android:theme="@style/Theme.Pa"
        tools:targetApi="31">
        <activity
            android:name=".MainActivity"
            android:exported="true">
            <intent-filter>
                <action android:name="android.intent.action.MAIN" />
                <category android:name="android.intent.category.LAUNCHER" />
            </intent-filter>
            <meta-data
                android:name="android.app.lib_name"
                android:value="pa" />
        </activity>
    </application>
</manifest>
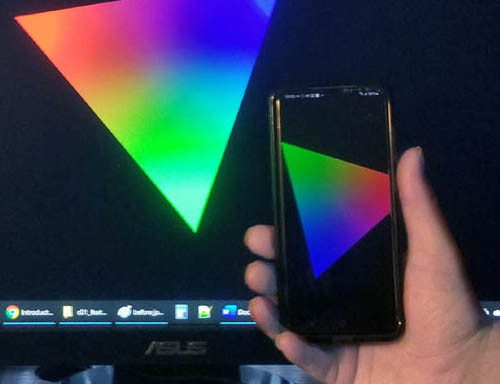
8. Turn on your Android, unlock, plug in, allow debugging, wait for it to show up in Android Studio and RUN (green arrow).
Ta-da!!
Runs on BOTH Android AND Windows:

Now we can claim that we DO have a real cross-platform solution!
Again, just in case, both Android and Windows cross-platform solutions are saved on GitHub.
Link: https://github.com/bkantemir/_wg_405